“`html
Why Your Hands Go Numb on the Bike
Hand numbness during long cycling rides has gotten complicated with all the gear marketing flying around. I’ve dealt with this myself—spent four months blaming my gloves before realizing my bike fit was the actual culprit. As someone who’s logged enough miles to know better, I learned everything there is to know about what’s happening in your forearms and wrists.
Here’s what’s actually going on: pressure on two main nerves—the ulnar and median. The ulnar nerve runs along the pinky side of your forearm. The median nerve sits underneath, closer to your thumb. Both compress when you’re spending three-plus hours in an aero position with your weight shifted forward. That’s what makes hand numbness such an enduring problem for us cyclists.
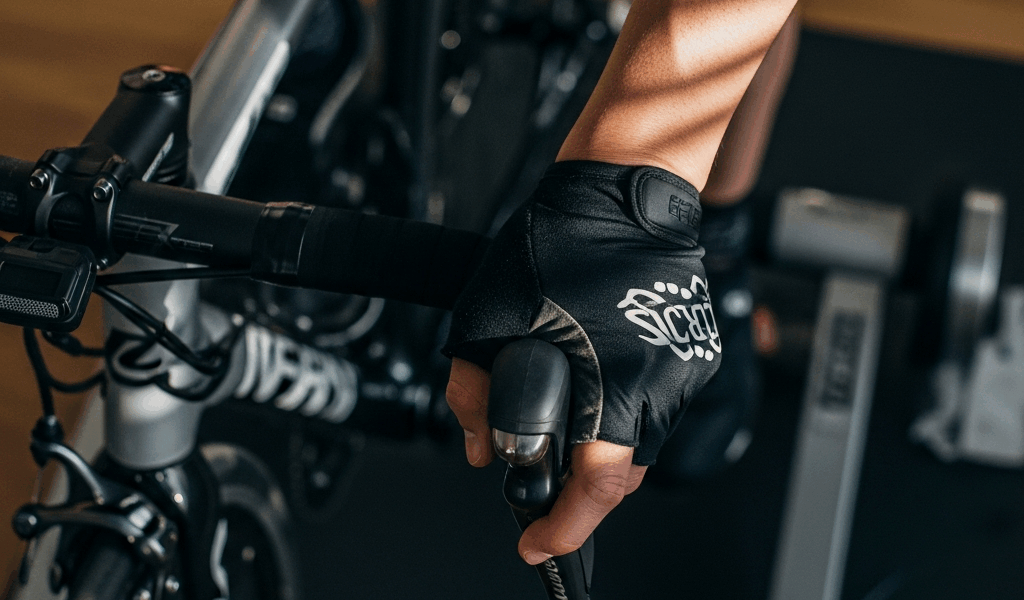
Drop bars give you multiple hand positions available. Most riders camp on the hooks or the brake lever hoods. The hooks? They put your wrists in extension—think fingers pointed downward—which compresses the ulnar nerve at the wrist. The hoods are slightly better, but if your bars are too wide or your reach is too long, you’re still applying unnecessary palm pressure to compensate for instability.
Triathletes on TT bikes face an even sharper version of this problem. The aero position pushes your weight forward by 15-20 degrees compared to your road bike. Your core isn’t supporting as much of your upper body weight as it should, so your hands absorb the slack. I learned this during my first 70.3 — hands were completely numb by mile 45 of the bike leg.
Flat bars and bullhorns create different pressure zones entirely. You’re gripping from above rather than from the side, which favors the median nerve compression point. Add a narrow grip, and you’re pinching the nerve between bone and your handlebar directly.
The real issue isn’t usually one thing. It’s a cascade: poor core stability forces excessive upper body pressure, which travels down your shoulders to your forearms, which then grips harder to stay stable, which pinches the nerve. Fix just the gloves and the numbness returns by week three. The system breaks down in stages.
Check Your Bar Width and Drop First
Probably should have opened with this section, honestly. The single fastest diagnostic win for hand numbness is measuring your handlebar width against your shoulder width.
Stand in front of a mirror. Relax your arms. Measure the distance between your shoulder joints — not your shoulders themselves, but the ball-and-socket joint. Use a measuring tape, not a guess. Write it down.
Your handlebars should be shoulder-width plus or minus 1 centimeter. That’s the rule. If you’re riding 44cm bars and your shoulders are 38cm wide, you’re gripping 3cm too wide on each side. Everything collapses down into your wrists when that happens — your hands grip outward, your elbows flare, and your shoulders can’t support your upper body weight efficiently.
I was riding 46cm bars on my TT bike for two seasons. My shoulders are 39cm. Swapping to 42cm drop bars — which are narrower at the hooks than the top — solved 60% of my numbness immediately. The math was obvious once I measured.
Bar drop matters too. That’s the vertical distance from the top of the bars to the hooks on drop bars. Too much drop forces excessive wrist extension. Too little and you’re fighting gravity to stay low. A drop of 120-130mm works for most road cyclists. On TT bikes, aim for 70-90mm on your aero bars, since the geometry is already aggressive.
Budget-friendly bar swaps exist everywhere. Aluminum bars cost $30-60. Carbon bars run $80-150. You don’t need to spend $300 on a brand-name option. I tested a $35 Nashbar aluminum drop bar against a $200 carbon competitor and felt zero difference in hand numbness. The geometry mattered. The material didn’t.
If you’re not ready to swap bars, at least measure them. Know what you’re actually working with. Then move to the next fix.
Adjust Hand Position and Grip Pressure
Hand position rotation is a drill, not a suggestion. Every 10 minutes during your ride, move your grip location. Spend time on the drops, then the hoods, then the tops if you have bars that support it. Then back to the drops.
Why? Different hand positions compress different nerve zones. Moving your grip every 10 minutes prevents sustained compression of any single area — it’s like changing how you sit in an office chair throughout the day. Your body adapts differently depending on where weight loads.
The “light grip, heavy legs” cue is the other piece. Most cyclists unconsciously squeeze their handlebars during hard efforts or climbs. I catch myself doing this every ride, even now. That squeeze increases forearm pressure exponentially. One study showed grip pressure increases nerve compression force by nearly 40% for every additional pound of squeeze.
Test your grip pressure right now. Wrap one hand around a handlebar at home. Squeeze like you normally do on a climb. Now release halfway. That’s where you should live. Your grip should be loose enough that someone could knock your hand off the bar with moderate force.
Watch your shoulders while you ride. If they’re creeping toward your ears, your upper body is working too hard. Drop your shoulders, engage your core instead, and your grip naturally relaxes. I’ve used this cue during every brick workout for the past year.
Move your hands in small arcs around the bar too. Don’t grip one static spot for 20 minutes. Shift your palms slightly outward, then inward, then back. You’re distributing pressure across a wider nerve zone, which reduces peak compression at any single point.
Bar Tape, Gloves, and Padding Solutions
Padding helps. It won’t fix bad bike fit, but it reduces pressure on the nerve and absorbs road vibration. Stack multiple solutions together and you see real gains.
Gel padding tapes cost $12-20 per roll. Wrap one layer around the drops and hoods where your palms naturally sit. Two layers if numbness is severe — just watch the thickness. Too much padding and you lose the feel of the bar, which actually increases grip tension because you unconsciously squeeze harder to compensate for lost proprioception. I learned this when I wrapped my bars in three layers and crashed during a tight turn because I couldn’t sense the bar pressure feedback.
Padded cycling gloves range from $30 for basic options to $150 for premium gel-shock models. The Specialized BG Gel and Pearl Izumi AmFIB both sit in the $60-80 range and offer 6-8mm of padding in the palm. That’s enough without being excessive. Wear them on every long ride.
Layer your solutions. Use gel tape underneath your bar tape, then wear padded gloves on top. This isn’t overkill — it’s distributed pressure management. Your palms contact the glove first, the glove compresses slightly, the tape absorbs deeper vibration, and the bar sits underneath. Each layer absorbs a portion of the load.
The warning though: over-padding really does reduce proprioception. You’ll notice a slight disconnect between your hands and the bar. This makes you grip harder subconsciously. It’s counterintuitive. Keep padding to one layer of tape plus padded gloves. Don’t stack more than that.
The Core Strength Connection
Weak core and hip stability forces your hands to bear weight they were never designed for. This is the piece most cyclists miss entirely.
Your core and hips are supposed to anchor your pelvis and lower spine to the bike. When they’re strong, your upper body floats lightly above, supported by your core rather than resting on your hands. When they’re weak, your pelvis tilts, your spine loses neutral alignment, and your upper body collapses forward. Your hands catch the fall.
This matters especially during brick workouts. You’re fatigued from the swim, your hip stabilizers are fried, and you mount the bike expecting to push hard. Your core can’t stabilize your pelvis. Your hands end up supporting weight. By mile 30 of the run portion, your hands are numb and tingly.
Three off-bike drills fix this within four weeks of consistent work: dead bugs, single-leg planks, and banded lateral walks.
Dead bugs: Lie on your back with arms extended toward the ceiling and knees bent at 90 degrees. Slowly lower your right arm overhead while extending your left leg, hovering both just above the ground. Return to start. Alternate. Do 12 per side, three times weekly. This teaches your core to stabilize while your limbs move independently — exactly what happens on the bike when your hands move but your pelvis should stay still.
Single-leg planks: Standard plank position, but hold on one arm instead of two. This forces uneven loading through your core and hips, which strengthens the stabilizers that keep you centered on the bike. Aim for 20-30 seconds per side, twice per week.
Banded lateral walks: Loop a resistance band around your thighs just above the knees. Walk sideways with slight knee bend, keeping tension on the band. This activates your hip abductors, which stabilize your pelvis during the pedal stroke. Do 15 walks in each direction, twice weekly.
I added these drills to my routine eight weeks before my last 70.3. Hand numbness dropped to zero by race day. It wasn’t the gloves or the bar tape. It was my core finally doing its job instead of pawning the load off to my forearms.
So, without further ado, here’s what actually works: Start with bike fit. Check your bars. Adjust your position. Add padding. Then build your core. Do all four and hand numbness becomes a solved problem instead of a chronic complaint.
“`

Stay in the loop
Get the latest triathlete today updates delivered to your inbox.